 Skip to content
How To Replace Garage Door Spring Cable?
Maintaining the mechanical components of your garage door is essential for its safe and reliable operation. One such component, often overlooked, is the garage door spring cable. This cable works in conjunction with the springs to lift the door and lower it smoothly. When it frays or breaks, it can cause serious issues, including the garage door becoming inoperable or even dangerous. Fortunately, replacing the garage door spring cable is a task you can perform yourself with the right tools and instructions.
Understanding the Garage Door Spring Cable
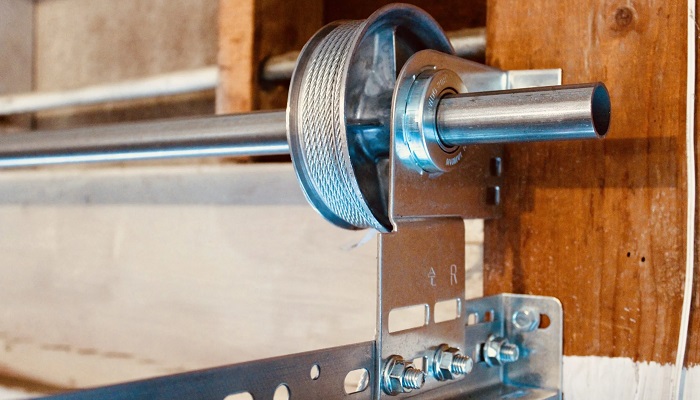
Garage door spring cables are crucial components of a torsion spring system. The cables, attached to the bottom of the garage door and wound around a drum at the top, transfer the energy from the torsion springs to the door, allowing it to move up and down smoothly. Without these cables, the springs would have no way of assisting with lifting the door, making it heavy and difficult to manage manually.
The cables are generally made of strong steel wire and are designed to withstand a lot of tension. However, over time, they can wear out due to friction, rust, or general wear and tear. A broken or damaged cable should be replaced promptly to avoid further damage to the garage door system or a potentially hazardous situation.
Tools and Materials You Will Need
Before you begin, gather the necessary tools and materials to make the replacement process efficient and safe. Here’s a list of what you’ll need:
- Replacement garage door spring cable
- Pliers
- Wrenches (a socket wrench is often ideal)
- Locking pliers or C-clamps
- Ladder
- Safety goggles
- Work gloves
It’s essential to ensure that the replacement cables you purchase are the correct size and strength for your particular garage door model. If you’re unsure, consult the manufacturer’s manual or seek advice from a professional.
Safety Precautions to Keep in Mind
Replacing a garage door spring cable involves working with high-tension components, which can be dangerous if not handled correctly. Always prioritize safety:
Disconnect the garage door opener: Before working on your garage door, make sure to disconnect the automatic garage door opener to prevent any accidental activation.
Release tension from the torsion springs: The springs hold a tremendous amount of tension, which must be safely released before beginning any work. Failure to do this can lead to severe injury.
Wear protective gear: Safety goggles and gloves are a must to protect your eyes and hands during the process.
Step-by-Step Guide to Replacing the Garage Door Spring Cable
Step 1: Prepare Your Work Area
Start by ensuring that your work area is clear of obstacles and well-lit. Position your ladder securely near the garage door where you’ll be working. Double-check that the power to your automatic garage door opener is disconnected.
It’s also important to have a second person on hand to assist you, especially when releasing and resetting the tension on the torsion springs. This person can help ensure that the door stays in place and provide assistance if something goes wrong.
Step 2: Release Tension from the Garage Door Springs
The first crucial step is to release the tension from the garage door springs. Depending on your door type, this can involve either torsion springs (found above the door) or extension springs (located along the sides).
If you have torsion springs, use a winding bar to carefully loosen the screws on the winding cone that holds the tension. Rotate the winding bar slowly in a controlled manner, ensuring the tension is released evenly. Use locking pliers to secure the torsion shaft in place while you work.
For extension springs, open the garage door fully and clamp it in place using C-clamps or locking pliers on both sides of the track. This helps release most of the tension from the springs, making them easier to handle.
Step 3: Disconnect the Old Cable
Once the tension is removed or minimized, you can disconnect the damaged or frayed cable. Start by unhooking it from the bottom bracket at the base of the garage door. This bracket is where the cable attaches to the door itself. You may need pliers or a wrench to remove the bolt or pin holding the cable in place.
Next, trace the cable upward to the cable drum at the top of the door. The cable drum is a circular, grooved piece attached to the torsion shaft. The cable winds around the drum as the door lifts. Use a wrench or screwdriver to release the cable from the drum.
Step 4: Install the New Cable
Now that the old cable is removed, it’s time to install the new one. Start by attaching the new cable to the bottom bracket. Ensure that it’s securely hooked into place, as this will bear the tension of the entire door.
Next, run the cable up the length of the door and carefully wind it around the cable drum. Ensure that the cable fits snugly into the grooves of the drum and that it is evenly aligned. The cable should not overlap or twist during installation, as this can cause uneven tension and damage to the door.
Once the cable is properly wound around the drum, check that it is taut but not overly tight. Repeat the process on the other side of the garage door if both cables need replacement.
Step 5: Reset the Tension on the Springs
After the new cables are installed, the next step is to reset the tension on the torsion springs. For torsion springs, use the winding bars to carefully wind the spring back to its proper tension level. Make sure to refer to your garage door’s manual for the exact number of turns required to apply the correct amount of tension.
For extension springs, remove the clamps or locking pliers holding the door in place and allow the springs to take on the tension as the door lowers.
Be sure to test the tension of the springs by manually lifting the garage door a few inches. The door should remain in place when released. If it drops or feels unbalanced, you may need to adjust the tension further.
Step 6: Test the Garage Door
Once the springs are correctly tensioned, reconnect the garage door opener and test the door’s operation. Open and close the door several times to ensure that it moves smoothly and without any jerking or hesitation.
Pay attention to any unusual noises, as these can indicate that something is wrong with the installation. If the door doesn’t seem to be operating correctly, double-check the cable installation and spring tension.
Maintaining Your Garage Door Cables
Replacing your garage door cables is just one part of maintaining your door’s overall health. Regular inspection and maintenance are key to prolonging the life of your garage door system. Here are a few tips:
Inspect cables periodically: Look for signs of wear, fraying, or rust on the cables. Catching damage early can prevent major issues later.
Lubricate moving parts: Apply a silicone-based lubricant to the cables, springs, and other moving parts to reduce friction and wear.
Check spring tension: Keep an eye on the tension in your torsion or extension springs. Adjust them as needed to ensure the door operates smoothly.
Conclusion
Replacing a garage door spring cable may seem daunting, but with the proper tools, safety precautions, and step-by-step guidance, it’s a task that many homeowners can tackle on their own. Regular maintenance and timely repairs of the garage door cables are essential to keeping your garage door operating safely and efficiently for years to come.
A1 Garage Doors is providing maintenance and installation services related to garage doors and their parts. If you’re looking for a trustworthy service by skilled technicians you can count on, give us a call at 343-309-9964 for a free quote.