 Skip to content
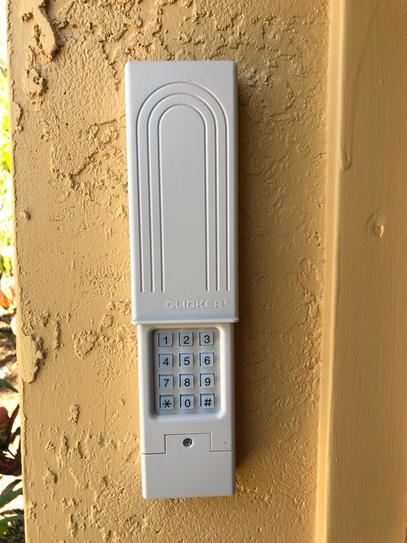
How To Program Garage Door Keypad Clicker?
Garage door keypads offer a convenient way to access your garage without needing a remote or key. They are secure, reliable, and allow you to enter your garage with just a code, making them an ideal solution for homeowners who want to enhance their property’s accessibility. However, many people find the process of programming their garage door keypad clicker a bit daunting. This guide will walk you through the steps needed to program a garage door keypad clicker efficiently and effectively.
Understanding Your Garage Door Opener
Before you begin programming your garage door keypad, it’s essential to understand the type of garage door opener you have. Garage door openers generally fall into three categories: chain drive, belt drive, and screw drive. Each of these systems works slightly differently, but most modern garage door openers come with a similar method for programming a keypad.
Additionally, you should check whether your opener is compatible with the type of keypad clicker you are using. Most keypads work universally with several brands, but some may have specific compatibility requirements. The user manual of both the keypad and the garage door opener will provide this information.
Step 1: Clear the Garage Door Opener’s Memory (Optional)
If your garage door opener has been previously programmed with a remote or another keypad, it’s advisable to clear its memory before programming a new keypad clicker. This ensures there are no conflicting signals or interference when setting up the new device.
To clear the memory, locate the “Learn” button on your garage door opener unit, typically located on the back or side of the motor housing. Press and hold the button until the indicator light turns off, signaling that the memory has been cleared.
Step 2: Locate the Learn Button
Once you’ve ensured your garage door opener is ready for programming, the next step is to locate the “Learn” button on the opener. This button is typically found on the motor unit mounted to the ceiling of your garage. The “Learn” button may be colored differently depending on the brand, commonly found in red, yellow, or purple.
Pressing the “Learn” button prepares the opener to receive new signals from the keypad. Make sure to have the keypad nearby when you press the button, as you will need to complete the programming process within 30 seconds.
Step 3: Enter the Programming Mode on the Keypad
After pressing the “Learn” button on the opener, turn your attention to the keypad. The programming process may vary slightly depending on the model and manufacturer, so consult the user manual for specific instructions. Generally, you will follow these steps:
Power on the Keypad: If your keypad is wireless, ensure that it has batteries installed and is turned on.
Enter the Factory Default Code: Most keypads come with a factory preset code, such as “1234” or “0000.” Enter this code to begin the programming process.
Press the Program Button: Once you’ve entered the factory code, press the “Program” button on the keypad. This button may be labeled differently depending on the model, such as “Learn,” “Set,” or “Enter.”
At this point, the keypad will be ready to receive a new code.
Step 4: Create Your Personalized Code
Now that your garage door opener and keypad are in programming mode, it’s time to set your personalized access code. Choose a code that is easy for you to remember but hard for others to guess. Avoid common combinations like “1234” or repeating digits such as “1111” to ensure maximum security.
To program your new code, follow the prompts on the keypad display:
Enter the New Code: Type in your desired access code, usually between four and six digits long, depending on the keypad model.
Confirm the Code: Some keypads will require you to confirm the code by re-entering it. Make sure you do this carefully, as an error may prevent the keypad from programming correctly.
Finalize the Code: Once the code has been confirmed, press the “Program” or “Enter” button again to store the new code.
Step 5: Test the Keypad
After programming your personalized code, it’s essential to test the keypad to ensure it functions correctly. To do this, stand outside your garage and enter the code you’ve just programmed. Press the “Enter” button or designated key on your keypad to signal the garage door opener.
If the garage door opens or closes as expected, congratulations—you’ve successfully programmed your garage door keypad clicker! If the door does not respond, double-check that the code was entered correctly and ensure that the “Learn” button was pressed within the allotted time frame.
Step 6: Troubleshooting Common Issues
If your garage door keypad clicker is not functioning correctly, don’t panic. Several common issues can cause the keypad to malfunction, and most can be resolved easily.
Battery Issues: If your keypad is wireless, dead or dying batteries can prevent it from communicating with the garage door opener. Replace the batteries and attempt the programming process again.
Distance and Interference: Ensure that you are within the operational range of the opener and that there is no signal interference between the keypad and the motor unit. Metallic objects or electronic devices may interfere with the keypad’s signal.
Incorrect Code Entry: Double-check that the code was entered correctly and that all steps were followed precisely. If necessary, restart the programming process from the beginning.
Keypad Lockout: Some keypads have a security feature that temporarily locks the keypad after several incorrect code entries. If this occurs, wait a few minutes and then try again.
Step 7: Resetting the Keypad (Optional)
If you continue to experience problems or need to reset the keypad for any reason, most keypads have a factory reset option. This option will revert the keypad to its original settings, allowing you to start the programming process from scratch.
To reset the keypad, locate the reset button, often hidden inside the battery compartment. Press and hold the reset button for several seconds until the keypad resets. After resetting, follow the same steps outlined above to reprogram your personalized code.
Tips for Securing Your Garage Door Keypad
Once you’ve successfully programmed your garage door keypad clicker, there are a few additional steps you can take to ensure your security remains intact.
Change Your Code Regularly: To enhance security, consider changing your keypad code periodically. This practice ensures that even if someone gains access to your code, they will not have access indefinitely.
Avoid Sharing Your Code Widely: Only share your garage door code with people you trust. If multiple individuals need access, consider setting up temporary codes that you can disable later.
Install a Backup Battery: If your keypad is wireless, consider installing a backup battery system for the motor unit to ensure you can always access your garage, even during a power outage.
Conclusion
Programming your garage door keypad clicker may seem complicated at first, but with the right instructions, it can be done quickly and easily. By following the steps outlined in this guide, you can program your keypad and enhance the security and convenience of your garage. Whether you’re replacing an old keypad or installing a new one for the first time, the ability to enter your garage with just a few taps of a keypad code provides both practicality and peace of mind.
A1 Garage Doors is providing maintenance and installation services related to garage doors and their parts. If you’re looking for a trustworthy service by skilled technicians you can count on, give us a call at 343-309-9964 for a free quote.